
There are multiple overlapping systems at work within Xenoblade Chronicles 3’s wonderfully strategic combat system. From returning elements such as auto-attacks, positional attacks, class-based tactics like drawing aggro and performing combos that break and topple your foes, to new stuff like that fancy new Interlinking shenanigans that sees you morph into powerful killing machines.
On top of all of this we’ve also got Chain Attacks, which can seem a little bit complicated at first glance, so let’s take a quick look at what makes them tick.
Xenoblade Chronicles 3 – Chain Attacks Guide
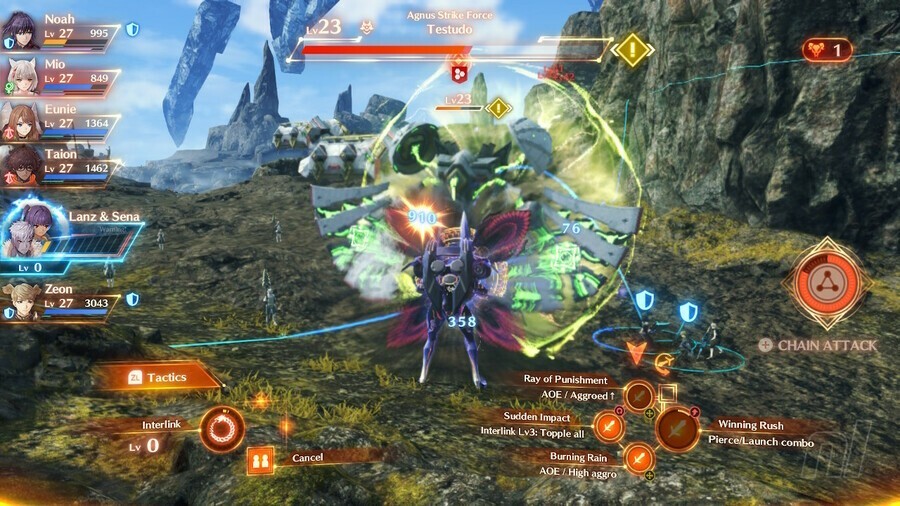
As you battle opponents in Xenoblade Chronicles 3 you’ll gradually fill up your Chain Attack Gauge, which is located to the right side of your screen during regular battles, as shown in the pic below. When this is ready it’ll start flashing and a quick press of the “+” button will see you enter the game’s Chain Attack state.
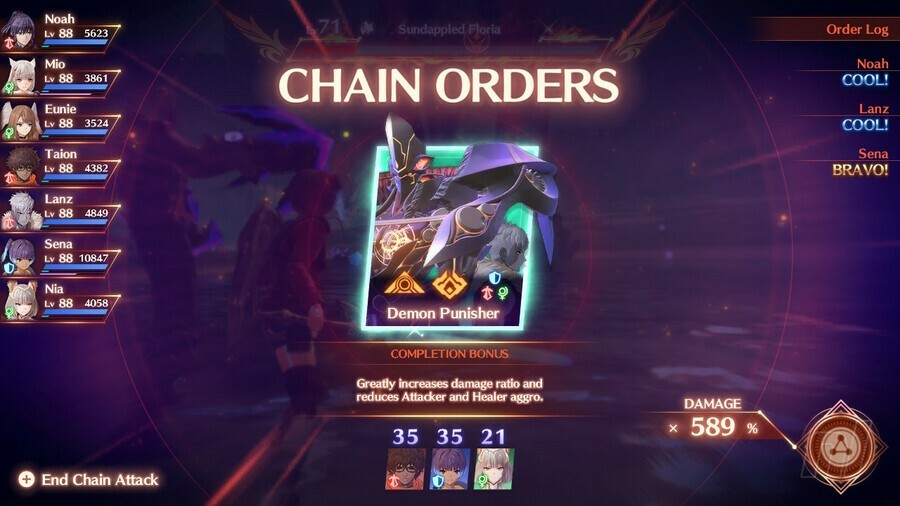
Once in a Chain Attack you’ll be presented with a Chain Order screen featuring a handful of different characters, each with their own attack order that can be carried out. Browse through these attack orders and have a look at the bonuses that you’ll receive for successfully completing them. For example, if you were to pick Mio’s “Lightning Quick” order, your bonus will be the reduction of attacker and healer aggro by 100%, as shown in the Completion Bonus details just under the order selection. Noah’s Brave Assault gives attacks a 100% chance to bypass defences, and so on.
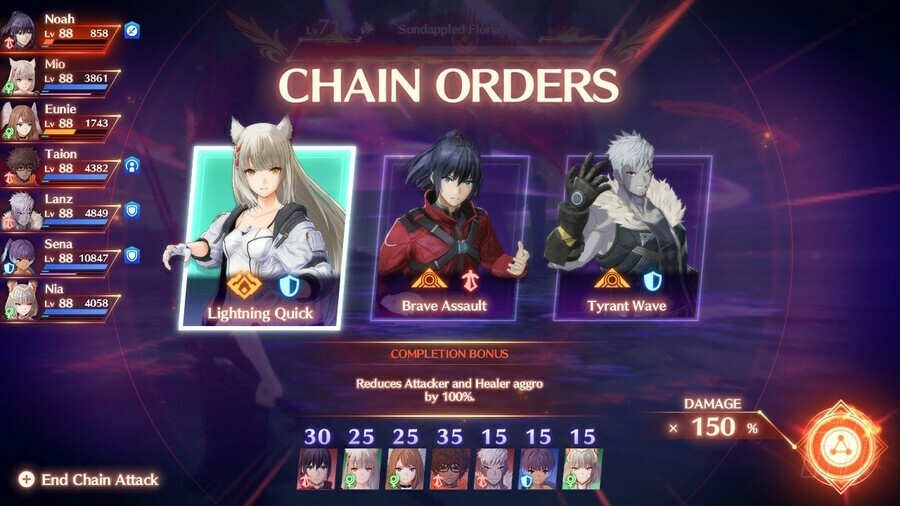
Successful completion of the order you choose grants you this bonus, and it’s a bonus that will stick for the entire duration of the Chain Attack at hand, stacking with all the others you accumulate. Sweet. Now let’s choose an order, we’re gonna go with Noah because we want that defence-neutralising bonus, and once we do we’re in the attack proper. Take a look below and you’ll see our available characters in the bottom left of the screen. It’s important to note here that anyone who’s out of commission when you first start a Chain Attack will not be available to use, so think about that when you’re about to kick one off. It’s also important to note that once you use a character that’s them out of the current chain attack, unless they get reactivated, and we’ll have a look at reactivation a little bit later.
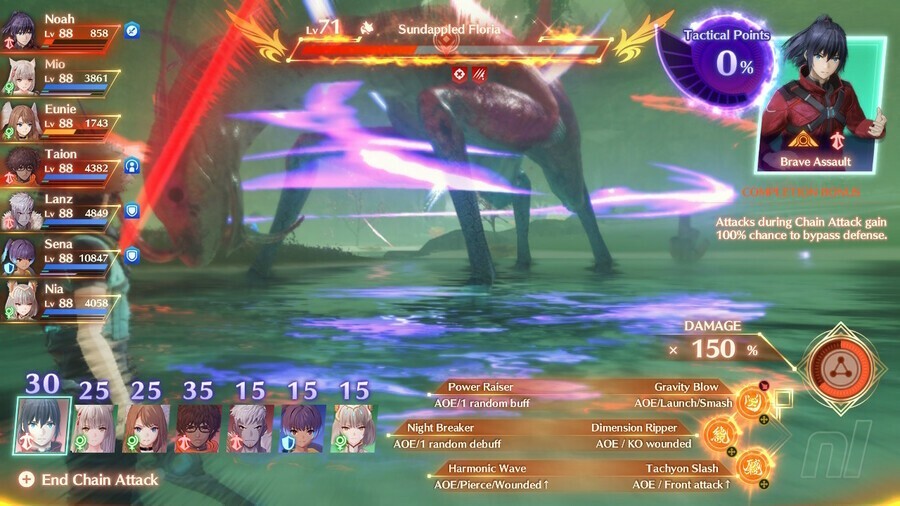
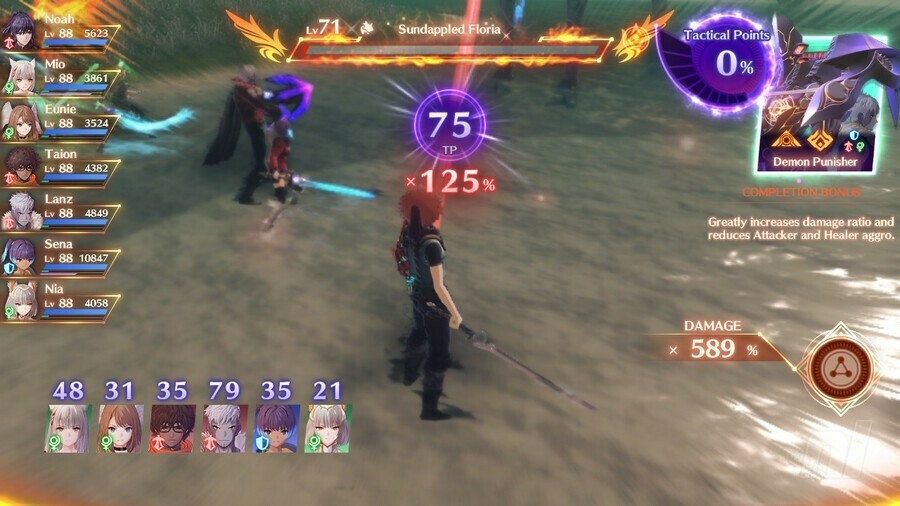
But first, let’s look at our available characters as we enter the attack order. Each one has got numbers above their heads, these are Tactical Points (TP). The number above each combatant’s head is the lowest amount of TP that you’ll accrue for choosing to use them in a turn. What do we need to accrue TP for? Well, in the top right you’ve got a TP Gauge and we need to get that TP gauge over the 99% mark in order to successfully complete the order. So, at it’s most basic, our job here is to choose characters who’ll make that number go to 100% and beyond. Once we’re there, we get to sit back and watch a cool animation as your enemy takes a drubbing. The further above 100% you go, the higher your damage multiplier rises in the bottom right of your screen and the more energy we tear off our foe’s health bar.
This is where Chain Attacks now start to fold in lots of lovely layers of strategy as you get used to doing them and start to consider, not just the TP numbers involved or bonus you’ll gain, but what attacks you’re performing and how they affect you both during the Chain Attack and afterwards.
If you choose an attacker, you need to consider what attack to use in order to do as much damage as you can, raising the TP as far above that base number as possible. For example, Noah is starting out with a TP of 30 here so that’s our base, but depending on what attack we use, how many times it hits, its position and type, it’ll add a bunch more TP to that total. This may feel complex starting out but you’ll soon get an idea of what attacks do the big numbers.
Further to this, we need to consider other aspects such as healing and buffs. If your party is in bad shape, low on health, you’ll want to pull off healing attacks in order to get your health back up so you come out of a Chain Attack in good shape. In this way – and this is something you can consider once you’re used to the whole thing – you can save up the use of a Chain Attack in battle just to deploy it when you’re in dire need of healing. Healers can also lower your enemy’s defences and you can raise your team’s defences also. Lots of things to consider here beyond the TP gauge just filling up.

Now there a few other rules that will always apply once you’ve chosen a Chain Order and get started on an attack.
Class-Specific Rules
1. Using a character with the same class as the order – check the symbol on the order itself – will ensure you get bonus TP points for their move. For example, Noah’s Brave Assault order has a red attacking sword symbol on it, so using a character with this symbol will net you bonus points.
2. Attacking characters, if chosen first, will always get a 125% multiplier to their TP at the end of their turn.
3. Support characters, such as healers, can’t make the TP gauge go over 99%, so you can’t use them to end a round – unless they’re a special Hero who can bypass this. This might seem annoying, but what you can do here is use support characters to safely get right up to 99% without going over and ending the order. Then you can use a character with a high base TP number and choose an attack that’ll do big damage to watch that gauge rocket upwards.
3. Ending an order with a defender (blue shield icon) will guarantee that you’ll reactivate the character with the current highest base TP for your next round. This means you can build a character’s base TP up over multiple turns to really score some big points and jack that damage multiplier up.
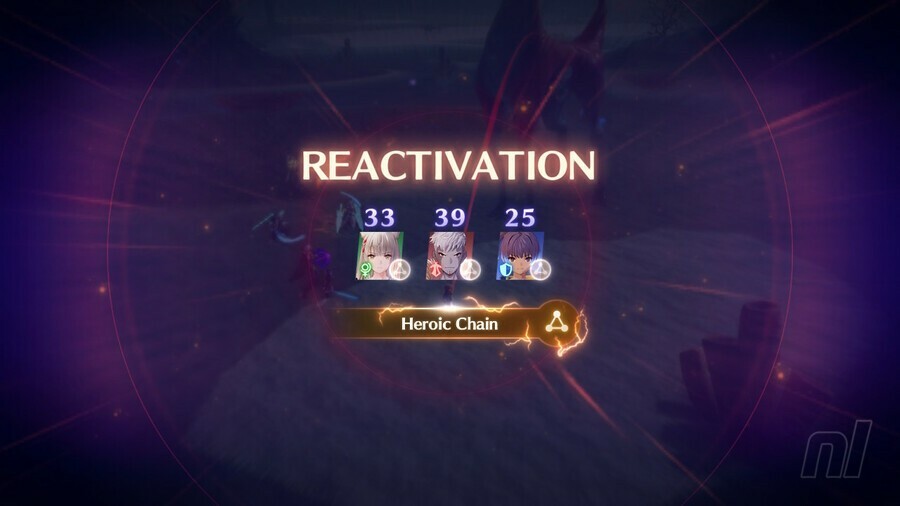
Reactivation
We mentioned Reactivation earlier. After each successful order you’ll automatically reactivate a character, so you’re getting one person back to bolster how many attempts you’ve got to complete your next chosen order. As we already said, you can also affect who you reactivate by using a defender character to finish an order, giving you the highest base TP member of your team back for the next round.
Further to this, depending on the TP gauge score you end up with at the end of an order, you’ll get more and more reactivated characters back to play with. Score over 100% and you’ll get one character back. Score over 150, you’ll get two, and anything over 200 nets you three teammates to blast into the next round with.
There are a bunch of other ways to affect reactivation beyond these few parameters, mostly by making sure you’ve got a hero character on your squad, each of whom has a special ability during Chain Attacks. Teach, for example, if used last in an order, guarantees you a TP gauge score of 150, so you get two reactivations. Play around with heroes and remember to choose wisely as you attack in order to max out that gauge and keep the Chain Attack rolling.
Interlink Attacks
Interlink attacks within a Chain Attack can do massive damage and, in order to pull them off, you simply need to complete the Chain Order of two Ouroboros partners. So, for example, complete Lanz’s order and then complete Sena’s order and you’ll find their joint Ouroboros order awaiting you when you return to the order screen. The great thing about these orders, besides all the extra damage they do, is that they reactivate your entire party to join in.
However, these attacks, once performed, will also end your current Chain Attack, so be aware of this if you want to max out your turns. Further to this, you can also actually perform two Interlink attacks by entering a Chain Attack once your Interlink Level hits 3 during normal battle, so raise your Interlink Level up by pulling off fusions, combos and so on then hit that Chain Attack Button once you’re ready.
Overkill
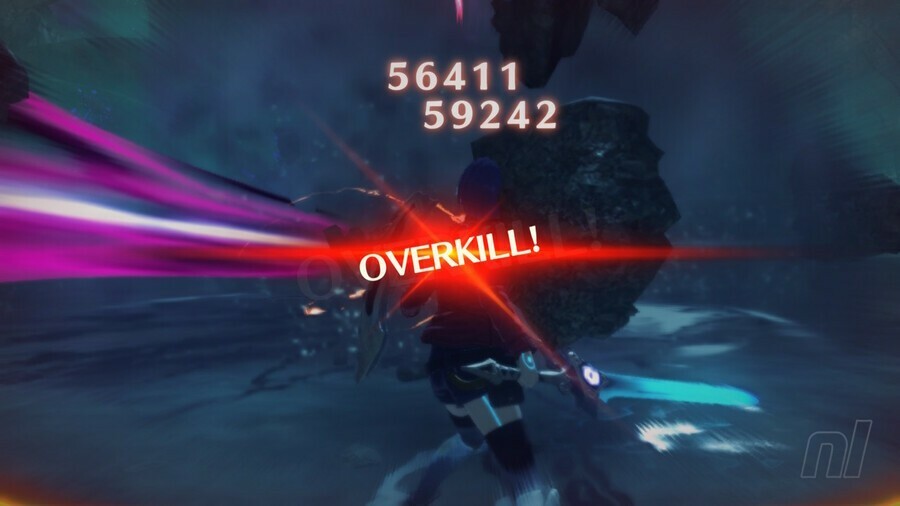
Overkill. This is very straightforward. If you manage to kill an enemy during a Chain Attack that’s not yet completed, you’ll go into Overkill mode which gives you sweet bonus XP gains. You can see these XP gains as a percentage in the bottom right of the screen just above your damage multiplier. Keep completing orders, up until the max allowed, and you’ll keep racking up the XP bonuses. Simple.
Remember to check the in-game guide if you’re confused by any aspect of Chain Attacks and try out some of the tutorials in order to really get a good understanding of everything and you’ll soon be knocking that TP Gauge up over the 500% mark like an absolute beast. Good luck!
This article is part of our Xenoblade Chronicles walkthrough and guide series. We’ll help you survive your journeys across Aionios with information you’ll need to make the most of the game, such as How To Unlock Traversal Skills (Wall Climbing, Rope Sliding, Scree Walking, Hazard Neutralization), How To Unlock And Upgrade All Heroes And Classes, How To Get Affinity And XP Rewards from Collectopaedia Cards, and How To Unlock The Nopon Coin Xchange.
We’ll also let you know where to find Every Rest Spot Location, All Unique Monster Locations and Every Ferronis Hulk Location, plus All Meal Recipes, Effects & Where To Find Them, and advice on whether you should play the previous Xenoblade Chronicles games before starting XC3.
And finally, you can check out our review and Where to Buy Xenoblade Chronicles on Nintendo Switch, if for some reason you haven’t yet picked up the game!